DISABLE INDEXING SERVICES
Indexing Services is a small little program that uses large amounts of RAM and can often make a computer endlessly loud and noisy. This system process indexes and updates lists of all the files that are on your computer. It does this so that when you do a search for something on your computer, it will search faster by scanning the index lists. If you don't search your computer often, or even if you do search often, this system service is completely unnecessary. To disable do the following:
1. Go to Start
2. Click Settings
3. Click Control Panel
4. Double-Click Add/Remove Programs
5. Click the Add/Remove Window Components
6. Uncheck the Indexing services
7. Click Next
OPTIMISE DISPLAY SETTINGS
Windows XP can look sexy but displaying all the visual items can waste system resources. To optimise:
1.Go to Start
2. Click Settings
3. Click Control Panel
4. Click System
5. Click Advanced tab
6. In the Performance tab Click Settings
7. Leave only the following ticked:
- Show shadows under menus
- Show shadows under mouse pointer
- Show translucent selection rectangle
- Use drop shadows for icons labels on the desktop
- Use visual styles on windows and buttons
DISABLE PERFORMANCE COUNTERS
Windows XP has a performance monitor utility which monitors several areas of your PC's performance. These utilities take up system resources so disabling is a good idea.
To disable:
1. download and install the Extensible Performance Counter List
2.Then select each counter in turn in the 'Extensible performance counters' window and clear the 'performance counters enabled' checkbox at the bottom.button below.
SPEEDUP FOLDER BROWSING
You may have noticed that everytime you open my computer to browse folders that there is a slight delay. This is because Windows XP automatically searches for network files and printers everytime you open Windows Explorer. To fix this and to increase browsing significantly:
1. Open My Computer
2. Click on Tools menu
3. Click on Folder Options
4. Click on the View tab.
5. Uncheck the Automatically search for network folders and printers check box
6. Click Apply
7. Click Ok
8. Reboot your computer
IMPROVE MEMORY USAGE
Cacheman Improves the performance of your computer by optimizing the disk cache, memory and a number of other settings.
Once Installed:
1.Go to Show Wizard and select All
2.Run all the wizards by selecting Next or Finished until you are back to the main menu. Use the defaults unless you know exactly what you are doing.
3.Exit and Save Cacheman
4.Restart Windows
OPTIMISE YOUR PAGEFILE
If you give your pagefile a fixed size it saves the operating system from needing to resize the page file.
1. Right Click on My Computer and select Properties
2. Select the Advanced tab
3. Under Performance choose the Settings button
4. Select the Advanced tab again and under Virtual Memory select Change
5. Highlight the drive containing your page file and make the initial Size of the file the same as the Maximum Size of the file.
Windows XP sizes the page file to about 1.5X the amount of actual physical memory by default. While this is good for systems with smaller amounts of memory (under 512MB) it is unlikely that a typical XP desktop system will ever need 1.5 X 512MB or more of virtual memory. If you have less than 512MB of memory, leave the page file at its default size. If you have 512MB or more, change the ratio to 1:1 page file size to physical memory size.
RUN BOOTVIS - IMPROVE BOOT TIMES
BootVis will significantly improve boot times
1. Download and Run
2. Select Trace
3. Select Next Boot and Driver Trace
4. A Trace Repetitions screen will appear, select Ok and Reboot
5. Upon reboot, BootVis will automatically start, analyze and log your system's boot process. When it's done, in the menu go to Trace and select Optimize System
6. Reboot.
7. When your machine has rebooted wait until you see the Optimizing System box appear. Be patient and wait for the process to complete
REMOVE THE DESKTOP PICTURE
Your desktop background consumes a fair amount of memory and can slow the loading time of your system. Removing it will improve performance.
1. Right Click on Desktop and select Properties
2. Select the Desktop tab
3. In the Background window select None
4. Click Ok
REMOVE FONTS FOR SPEED
Fonts, especially TrueType fonts, use quite a bit of system resources. For optimal performance, trim your fonts down to just those that you need to use on a daily basis and fonts that applications may require.
1. Open Control Panel
2. Open Fonts folder
3. Move fonts you don't need to a temporary directory (e.g. C:\FONTBKUP?) just in case you need or want to bring a few of them back. The more fonts you uninstall, the more system resources you will gain.
DISABLE UNNECESSARY SERVICES
Because Windows XP has to be all things to all people it has many services running that take up system resources that you will never need. Below is a list of services that can be disabled on most machines:
Alerter
Clipbook
Computer Browser
Distributed Link Tracking Client
Fast User Switching
Help and Support - (If you use Windows Help and Support leave this enabled)
Human Interface Access Devices
Indexing Service
IPSEC Services
Messenger
Netmeeting Remote Desktop Sharing (disabled for extra security)
Portable Media Serial Number
Remote Desktop Help Session Manager (disabled for extra security)
Remote Procedure Call Locator
Remote Registry (disabled for extra security)
Remote Registry Service
Secondary Logon
Routing & Remote Access (disabled for extra security)
Server
SSDP Discovery Service - (Unplug n' Pray will disable this)
Telnet
TCP/IP NetBIOS Helper
Upload Manager
Universal Plug and Play Device Host
Windows Time
Wireless Zero Configuration (Do not disable if you use a wireless network)
Workstation
To disable these services:
Go to Start and then Run and type "services.msc"
Doubleclick on the service you want to change
Change the startup type to 'Disable"
TURN OFF SYSTEM RESTORE
System Restore can be a useful if your computer is having problems, however storing all the restore points can literally take up Gigabytes of space on your hard drive. To turn off System Restore:
Open Control Panel
Click on Performance and Maintenance
Click on System
Click on the System Restore tab
Tick 'Turn off System Restore on All Drives'
Click 'Ok'
DEFRAGMENT YOUR PAGEFILE
Keeping your pagefile defragmented can provide a major performance boost. One of the best ways of doing this is to creat a separate partition on your hard drive just for your page file, so that it doesn't get impacted by normal disk usage. Another way of keeping your pagefile defragmented is to run PageDefrag. This cool little app can be used to defrag your pagefile, and can also be set to defrag the pagefile everytime your PC starts. To install:
Download and Run PageDefrag
Tick "Defrag at next Reboot",
Click "Ok"
Reboot
SPEEDUP FOLDER ACCESS - DISABLE LAST ACCESS UPDATE
If you have a lot of folders and subdirectories on your computer, when you access a directory XP wastes a lot of time updating the time stamp showing the last access time for that directory and for ALL sub directories. To stop XP doing this you need to edit the registry. If you are uncomfortable doing this then please do not attempt.
Go to Start and then Run and type "regedit"
Click through the file system until you get to "HKEY_LOCAL_MACHINE\System\CurrentControlSet\C ontr ol\FileSystem"
Right-Click in a blank area of the window on the right and select 'DWORD Value'
Create a new DWORD Value called 'NtfsDisableLastAccessUpdate'
Then Right Click on the new value and select 'Modify'
Change the Value Data to '1'
Click 'OK'
DISABLE SYSTEM SOUNDS
Surprisingly, the beeps that your computer makes for various system sounds can slow it down, particularly at startup and shut-down. To fix this turn off the system sounds:
Open Control Panel
Click Sounds and Audio Devices
Check Place volume icon in taskbar
Click Sounds Tab
Choose "No Sounds" for the Sound Scheme
Click "No"
Click "Apply"
Click "OK"
IMPROVE BOOT TIMES
A great new feature in Microsoft Windows XP is the ability to do a boot defragment. This places all boot files next to each other on the disk to allow for faster booting. By default this option in enables but on some builds it is not so below is how to turn it on.
Go to Start Menu and Click Run
Type in "Regedit" then Click ok
Find "HKEY_LOCAL_MACHINE\SOFTWARE\Microsoft\Dfrg\Bo otOp t imizeFunction"
Select "Enable" from the list on the right
Right on it and select "Modify"
Change the value to "Y to enable"
Reboot
Saturday, July 25, 2009
Increase your Internet Speed Up To 375%...No Software...Its a Trick!!!
Believe Me It Really Worked For Me....Try It...Will Just Take 2 Mins....
Hello Guys,
This is a short tutorial on how to increase your internet by 375% Faster or higher.
So That You Can:
Increase your browsing experience
Play online games LAG free
Load videos almost instantly
Turn your slow internet connection into Broadband DSL or even T1
Download anything faster with our "intelligent packet configurator"
Increase Speeds Up To 375% Faster!
1) Open Mozilla Firefox.
2) In addreas bar type: "about:config"
3)Look for were it says "network.http.pipelining" to TRUE
(Double Click it until it says TRUE)
4)Look for "network.http.proxy.pipelining" to TRUE
(Same way as stated above)
5) Now. Right-Click Anywere then click "Create New" Then "Integer". Name it "nglayout.initialpaint.delay"
Then Click Ok,then put the number "0" (Zero) in the next box
6) Click OK,
7) Restart Firefox.
8) Feel The Difference in Speed
Hello Guys,
This is a short tutorial on how to increase your internet by 375% Faster or higher.
So That You Can:
Increase your browsing experience
Play online games LAG free
Load videos almost instantly
Turn your slow internet connection into Broadband DSL or even T1
Download anything faster with our "intelligent packet configurator"
Increase Speeds Up To 375% Faster!
Code:
PLEASE NOTE: Only works for Mozilla Firefox
2) In addreas bar type: "about:config"
3)Look for were it says "network.http.pipelining" to TRUE
(Double Click it until it says TRUE)
4)Look for "network.http.proxy.pipelining" to TRUE
(Same way as stated above)
5) Now. Right-Click Anywere then click "Create New" Then "Integer". Name it "nglayout.initialpaint.delay"
Then Click Ok,then put the number "0" (Zero) in the next box
6) Click OK,
7) Restart Firefox.
8) Feel The Difference in Speed
Reformatting with a .iso on a USB drive
Installing Windows XP or any other operating system is easy if you have a USB optical disc drive. But if all you’ve got is a USB flash drive and another computer with a DVD burner, you can still install Windows XP (or many Linux distributions for that matter) on a disc drive-less ultraportable like the HP Mini-Note or the Asus Eee PC. After spending most of Saturday installing Windows XP on my HP Mini-Note I thought I’d share my results with you. Remember, your results may very, so while these are the steps that worked for me, they may not work for you. For example, depending on the version of Windows XP you are using, you may need a different hotfix to install the audio drivers.
There were two resources that were extraordinarily helpful. Bsumpter at MiniNoteUser wrote up an excellent tutorial for installing XP on a Mini-Note, and EeeGuides has a great walkthrough for installing XP on an Eee PC using a flash drive. By combining these methods and a few other, I was able to setup my Mini-Note with a Windows partition, a spare partition for installing Linux, and a large data partition for shared files.
Here’s what you’ll need:
- 1 USB flash drive, 1GB or larger
- 1 Windows XP installation disc
- Assorted files that I’ll describe as we go along.
Preparing the flash drive
First up, we need to prepare the flash drive.
- Download and unzip this file, which should contain 2 folders: 1 titled Bootsect, and the other USB_prep8.
- Navigate to the USB_prep8 folder and click on usb_prep8.cmd. This will bring up a Windows console window.
- Press any key to continue and a PeToUSB window will open.
- Make sure your flash drive is selected, and click start to format your flash drive.
- When the format is complete, click OK, but do not close the PeToUSB window or the Windows Console.
- Open a new console window by typing “cmd” into the run box in the Windows Start Menu.
- Find your Bootsect folder (if you’re not used to DOS commands, you can type “dir” to list directories and files, type “cd foldername” to navigate to a folder name – called foldername in this example, and if there’s a long folder name you can save time by typing the “cd” and just the first few letters and then hitting the Tab key to fill in the rest of the name).
- Once you’re in the Bootsect folder, type “bootsect.exe /nt52 g:” if “g” is the letter assigned to your flash drive. If it’s E, then change the letter to e. If it’s Z, make it z. Get it?
- When this is done, you should see a message letting you know that the bootcode was updated, and you can close this console window (but not the other console window).
- Close the PeToUSb Window, but make sure not to close the remaining console window yet
- You should now see a list of 8 options in the console.
- Select one and find the drive with your Windows installation disc.
- Select 2 and pick a random drive letter (but not one that’s already on your PC, since this will be a virtual drive used for copying your files).
- Select 3 and enter the drive letter for your USB flash drive.
- Select 4 and follow the rest of the on-screen directions and you should be all set.
The process should take about 15-20 minutes. When it’s done, you should have a bootable USB stick that you can use to install Windows XP the same way you would if you had a CD/DVD drive.
A few notes here. First of all, there’s a chance you may get down to step 15 and the program will tell you that it can’t create the virtual drive. This may happen if you’ve already gone through the whole process and are trying to do it again to fix problems. The solution seems to be rebooting your computer and trying again. Or at least that’s what worked for me.
Second, if you use NLite to shrink/slipstream/otherwise modify your Windows XP installation file, make sure you do not remove “manual installation files,” or your USB stick will be pretty much useless.
Installing XP on the Mini-Note
Now it’s time to load Windows XP onto your Mini-Note. If you have a USB CD/DVD drive, you probably skipped all the stuff above, and that’s fine. Most of the following steps should work as well. These instructions should work whether you’re installing Windows XP on a system that came preloaded with SUSE or Windows Vista.
- Insert your USB flash drive in one of the USB ports on your Mini-Note.
- Power on your computer and hit F9 to bring up a boot device selection window.
- Choose your flash drive, or if you’re using a USB optical disc drive, select that instead.
- Select 2 for a text-based installation.
- Make sure to delete all of the partitions on the hard drive. While you may have some success creating separate partitions on your hard drive using this method, I did not. If you find yourself with a Hal.dll or bootloader missing error when you’re finished, there’s a good chance it’s because you did not delete all of the partitions. Note that I will be providing instructions in the next section for partitioning your hard drive after installing Windows XP, so you can still create a Linux partition later.
- Create one large NTFS partition (using the quick option will save you a lot of time)
- Follow the on-screen directions.
- At least once during the install process, you will be prompted to reboot your computer. If you try to let it boot from the hard drive, you’ll get an error message. What you need to do is hit F9 again when it reboots and this time select option 1 for a GUI setup.
- Once you’re done installing XP, you may notice that you are unable to boot into Windows from the hard drive. If you have the USB disk installed, again hit F9, and select the GUI option again. Windows should start. You’ll need to edit the boot.ini file:
- Type “msconfig” into the run box in the start menu
- Select the BOOT.INI tab
- First, try the “Check All Boot Paths,” option. This may solve your problem by finding and removing the incorrect boot settings.
- You may also need to edit the boot.ini file manually if it doesn’t read something like ‘multi(o)disk(0)rdisk(o)partition(1)\Windows=”Windows XP Pro” /fastdetect’
- The most likely problem is that wrong partition is selected. It may say (0) or (2) or something like that. The steps below will show you how to backup and edit it.
- Open your System Properties by right-clicking on My Computer and choosing Properties. Alternately, you could type “sysdm.cpl” into the run box in the start menu
- Select the Advanced Tab
- Click the Settings option under Star
tup and Recovery - Click the button that says Edit to open up your boot.ini file in Notepad. It’s a good idea to save a backup now by selecting Save As, and saving the file to a place where you won’t forget it.
- Now you can (somewhat) safely edit the boot.ini file, changing the partition number or other settings to more closely resemble the one I listed above. Save your file, and hopefully you’ll be able to reboot without your USB stick.
Configuring Windows XP
Update: HP has added Windows XP drivers to its support page for the Mini-Note. You should try these official drivers before using the drivers listed below.
Now you should have a working Windows XP desktop, but you’ll find that you can’t connect to the internet via Ethernet or WLAN, you have no sound, and no support for the Fn keys. In order to fix these issues you’re going to need a few files. I’ve wrapped them all up into a ZIP file which you can download.
Once you’ve downloaded this file using another computer, you can copy it to your Mini-Note using a flash drive or SD card. Or if you’d rather just install the Ethernet drive so you can download the full 20MB ZIP file on your Mini-Note, you can find the Broadcom Ethernet Driver here. Once you unzip the files into a folder, you should have everything you need to get Windows XP up and running.
To install the Broadcom driver:
- Open the device manager by right-clicking on the My Computer dialog, selecting Hardware, and then Device Manager
- You should notice a bunch of little yellow alert icons. One will say something like Gigabit Ethernet. Honestly I forget exactly what I said, but it was pretty obvious.
- Right click on the Ethernet icon and select Update Driver.
- Select the Have Disk option, and navigate to the subfolder labeled win_xp_2k3_32 and choose the b57win32.inf file.
Now you should be able to connect to the internet, activate windows, and download most of the rest of the drivers you need from windows update. You’ll need to select the Custom option in order to get some of these updates. This should provide the drivers for your WLAN, touchpad, and other hardware.
Note that Windows Update didn’t automatically suggest the webcam driver for me. In order to install it, I had to find the webcam in the Device Manager (once all the other drivers, including the audio driver — see below — were installed, it was the only devices with a yellow flag next to it), and select the Install software automatically option. That did the trick.
Next, let’s enable sound. There does not appear to be a working audio driver for XP yet, but I’m holding out hope that HP will post one on its website when the company begins offering Mini-Note computers preloaded with Windows XP. I’m not going to hold my breath though. HP currently sells Mini-Notes preloaded with SUSE Enterprise, but there are no drivers or other support files on the HP web site for this configuration yet. Anyway, what you need to do is install a hotfix that will let you run the Windows Vista audio driver.
- Run the KB888111.exe patch. If you have Windows XP SP1, you can run the kb888111xpsp1.exe file instead. Note that you should do this before upgrading to Windows XP SP2 or SP3. In fact, when I tried to update my system from SP1 to SP2, I wound up with an unbootable system, so if you have a Windows XP Sp1 install disc, I’d recommend skipping SP2 altogether and jumping straight ahead to SP2. You can either grab a release candidate of SP3, wait a few days for Microsoft to release it officially, or if you look around I’m sure you can find it today.
- The file called sp38873.exe is the audio driver. Go ahead and click it and it will start to install the Vista audio drivers. Installation will fail because you’re not running Windows Vista, but the installer will create a folder that contains the driver.
- Find your sound device in the Device Manager. It should still be an unknown device with a big ole yellow flag next to it. Select update driver, choose the have disk option, and navigate to the folder where you unzipped your Vista audio drivers.
Keep in mind that this audio driver is not designed to run on Windows. And every time you boot your computer, a pop up window will alert you to this fact. Here’s how to disable this pop up:
- Type “msconfig” into the run box in the start menu.
- Select the startup tab.
- Uncheck the box next to smax4pnp.
- Click OK and reboot your computer.
Finally, you can install the HP QuickLuanch buttons to add support for the Fn keys. All you have to do here is click the file called HP buttons SP32280.exe and ignore any messages that pop up during this installation.
Now everything should work properly. You’ll probably want to adjust your display settings to use large or extra large fonts and large icons. The HP QuickLaunch utility also includes a Desktop Zoom utility which may help make your Mini-Note display a bit easier to see. But this computer has got a super-sharp display, so you may find that you need to tweak the default font sizes in other applications including Firefox if you want to be able to read your screen without squinting.
Using Parted Magic to create new partitions for Linux or other operating systems
While I tend to use Windows XP on a day to day basis, I wanted to make this a dual boot system so I can install Linux on a separate partition. Most Linux distributions aren’t very particular about where they’re installed. You can put them on a second or third partition, or even on an SD card in your card reader. But Windows likes to have the first partition all to itself. So while you may be able to use the Windows installer to set up partitions on the hard drive, I had more success installing Windows XP first, and then using Parted Magic to resize the Windows partition and create additional partitions.
The best time to do this is right after you install Windows. Your main partition will be fairly clean which will make the resizing operation go much more quickly. We’re talking about the difference between a minute or two and a half hour or more. You’ll also save yourself a lot of pain and heartache if something goes wrong and you wind up wiping your Windows partition, because you won’t have spent days loading and configuring all of your favorite programs yet.
I’m going to assume you’re still using a USB flash drive, but you can also use Parted Magic from a CD-ROM. Detailed instructions for setting up either a flash drive or a CD-ROM are available from the Parted Magic homepage. The main difference is that if you’re using a flash drive, you need to use SYSLINUX to make it bootable.
Once you’ve got your installation media:
- Reboot your Mini-Note with the flash drive or CD-ROM plugged into a USB port.
- Hit F9 and choose the device you want to boot from.
- From the boot menu, make sure to selection option 4: Failsafe Settings
- W
ait a few minutes until you’re presented with a command prompt that says “root@PartedMagic:~#” - Type “menu”
- Choose Xvesa (if you had tried almost anything other than option 4 in step 3, the system would try to boot using Xorg and your display would look all funny/unusable)
- You should now see a graphical user interface that looks a bit like this:

- Click the little blue icon on the bottom of the screen that says “VisParted.” This will bring up a partition manager
- Your primary hard drive should be listed as /dev/sda. But if it’s not, it shouldn’t be too hard to find since you probably only have one 120GB hard drive connected to your PC. Note that VisParted will say your hard drive is actually closer to 112GB.
- There should be one large partition labeled as /dev/sda1. You can right click on this and choose the resize/move option and then resize the partition either by dragging the edges or entering a value into the “new size” box.
- Once your Windows partition is shrunk, you an either leave the rest of your hard drive unpartitioned for future use, create an ext2, ext3 or other partition for Linux, or do something else altogether.
- Click the Apply button to execute.
- When Parted Magic is done working its magic, you can reboot your system by clicking on the shutdown menu at the bottom right side of your screen. If everything went properly, you should still be able to boot into Windows, but you’ll find that your Windows partition is smaller.

Personally, I decided to make a 25GB Windows XP partition for files and settings, a 15GB ext2 partition for installing Ubuntu or other operating systems, and I made a third NTFS partition for storing data that will be accessible no matter which OS I use.
Background Image for USB Window
USB drives or flash drives are widely used to transfer data between computers or carrying portable softwares so you can use different software in computers that do not have these softwares installed already. I have already shared some articles on making USB drives bootable and how can you hide, lock or encrypt files and folders in a USB drive.

This is an easy step by step tutorial on how you can put an image or picture on the background of a USB device. Follow these easy steps to display an image as background in your USB drive.
Step1: Copy this code in your text editor or Notepad and save it as “desktop.ini”
[.ShellClassInfo]
IconFile=%SystemRoot%\system32\SHELL32.dll
IconIndex=127
ConfirmFileOp=0
[{BE098140-A513-11D0-A3A4-00C04FD706EC}]
Attributes=1
IconArea_Image=”your_picture.jpg”
IconArea_Text=”0xFFFFFF”
VeBRA sources - don’t delete the tag above, it’s there for XXXXX purposes -
[ExtShellFolderViews]
{BE098140-A513-11D0-A3A4-00C04FD706EC}={BE098140-A513-11D0-A3A4-00C04FD706EC}
{5984FFE0-28D4-11CF-AE66-08002B2E1262}={5984FFE0-28D4-11CF-AE66-08002B2E1262}
[{5984FFE0-28D4-11CF-AE66-08002B2E1262}]
PersistMoniker=Folder.htt
PersistMonikerPreview=%WebDir%\folder.bmp
Step 2: Put this “desktop.ini” and your_picture.jpg in your USB drive and hide them if you want (Note: If the image that you want to display as background has different name change that to your_picture.jpg )
Step3: Refresh or re insert the USB drive in computer and you will see the image as background image in your USB drive.
Friday, July 24, 2009
Reformatting Your Computer Using Windows XP
Reformatting your Windows XP computer will erase everything on your hard drive and reinstall the operating system. To avoid losing your data (documents, pictures, music, etc.), you will want to backup your information prior to reformatting. See the ITS Help Desk Personal Data Backup Support Center for more information. After you have reformatted your computer, you will need to reinstall all of your personal data, as well as any software products you may use (for example, Microsoft Office, iTunes, Symantec AntiVirus, etc.).
Reformatting your Windows XP computer has three main parts:
- Reformatting the computer from your operating system CD.
- Reinstalling the drivers that came with your computer.
- Running Windows Update to reinstall all security updates and patches.
Please contact the ITS Help Desk (384-4357) prior to reformatting your computer if you have questions about any of these processes involved.
NOTE: If you have a network connection, please unplug from the network before starting installation.
1. First, make sure that your computer is set to Boot to CD. This is a different procedure depending on your computer. When your computer first boots look for an option to enter the BIOS settings. Under the BIOS settings find the "Boot Order" and make sure the CD-ROM is set to boot first. If you have any problems with this please contact the ITS Help Desk at 319-384-HELP.
2. With the Windows XP CD in the CD-ROM drive, save your BIOS settings and exit.
3. If you've done everything correctly you should be asked to "Press Any Key to Boot from CD".

4. After installing the necessary setup files, Windows XP will display your partitions. Delete any existing partitions by selecting the desired partition with the arrow keys, press D to delete and then L to confirm the deletion.
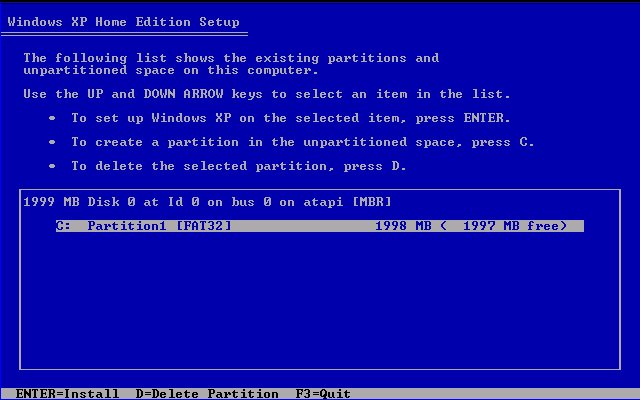
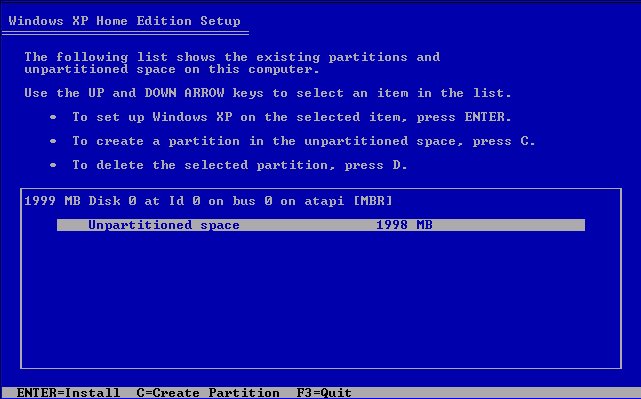
5. You should now have only one option, "Unpartitioned Space". Press Enter to install Windows XP to the unpartitioned space.
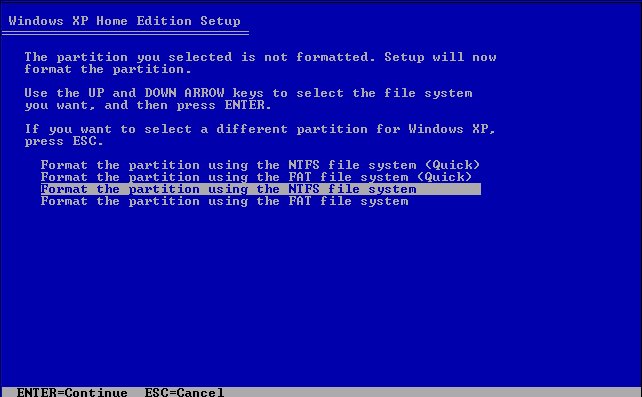
6. When asked how you would like to format the partition, select "Format using the NTFS file system".
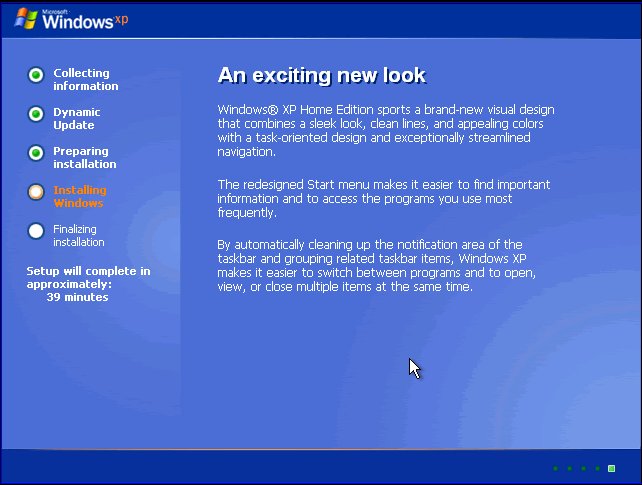
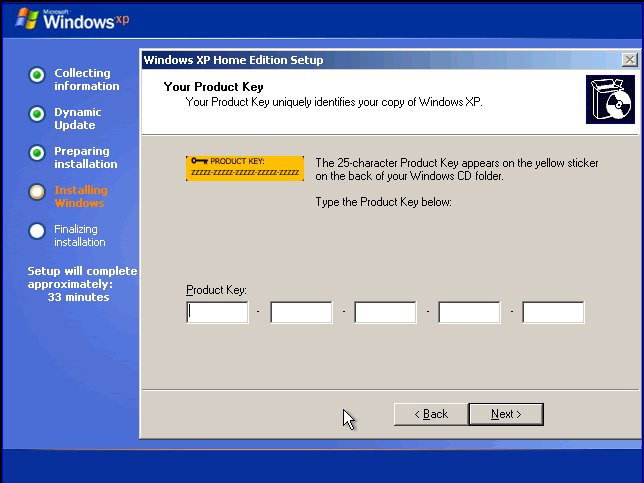
7. After the partition is formatted, Windows XP will begin installation. The computer will reboot. While the computer is rebooting, please do not touch any keys. From now on the screens will look like the following:
8. Enter your product key. If you purchased Windows XP from the IMU Bookstore, the product key will be located on the back of the sleeve your CD came in. If you are reformatting using a Windows XP CD that came with your computer, the product key may be located on a sticker somewhere on your computer case.
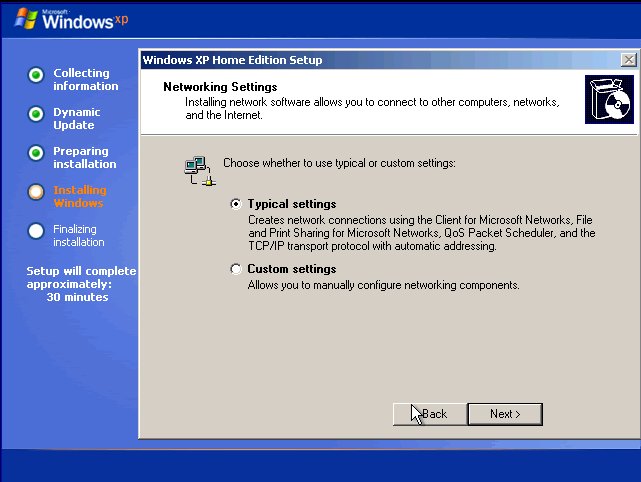
9. When asked for Network Settings, choose "Typical Settings".
10. Windows XP will now complete installation. Upon completion you will need to re-install the drivers for your hardware (Modem, Sound, Video, etc). Many PC companies such as Dell, Gateway, and HP will include a "Driver Installation CD" with the computer. Simply insert the CD and follow the instructions. Otherwise, you can download current drivers from many manufacturer's support web sites. If you have any problems please contact the ITS Help Desk at 319-384-HELP.
11. Next turn on the Internet Connection Firewall. Instructions to turn on the Internet Connection Firewall can be found here.
12. Reconnect your computer to the Network.
13. Run Windows Update by opening Internet Explorer, then clicking on Tools -> Windows Update. Follow the on-screen instructions for installing critical updates.
14. Restart your computer.
NBA Live 09 Cheats - Acheivements
Yes, we know these aren’t really NBA Live 09 Cheats as much as they are achievement levels but it’s what we have and considering that the game doesn’t even release for another month, this is pretty good. Most of the time this information doesn’t come out until the first week of gameplay so we are pretty psyched about the possibility of getting a lot of info out fast for this game.
Acheivements
Ice Water (30) Win a solo game in overtime vs. the CPU.Well Rounded Player (50) Get a ‘triple double’ with your player in a solo Be a Pro game vs. the CPU.
Super GM (100) Fully upgrade your Dynasty Mode team staff.
Perimeter Man (50) Fully complete all of the ‘Guard Station‘ challenges in the NBA LIVE Academy.
BMOC (50) Fully complete all of the ‘Big Man Station‘ challenges in the NBA LIVE Academy.
Team Player (50) Fully complete all of the ‘Team-Play Station’ challenges in the NBA LIVE Academy.
Club Victory (50) Play and win a Team Play Club match.
Created a Monster (25) Created a Monster 25 Score over 60 points with a created player in a solo game vs. the CPU.
The Comeback Kid (40) Win a solo game after being down by 20 points vs. the CPU.The Past is Present (25) Play and win a solo NBA LIVE Rewind Game vs. the CPU.
Game of the Week (30) Play and win a Game of the Week ranked match online.
BAP MVP (30) Win a Be a Pro game, receiving an 80 or higher Be a Pro rating with your player solo vs. the CPU.
NBA Finals MVP (30) Any player on your Dynasty Mode teams wins the NBA Finals MVP.
David and Goliath (50) Defeat any team rated 10 points or higher in a solo match on Superstar difficulty vs. the CPU.MVP (30) A player on your Dynasty Mode team wins the MVP of the regular season.
Old School (60) Win a game with no dunks or 3 point shots in a solo game vs. the CPU.
All-Star (20) Any player on your Dynasty Mode team makes the NBA All-Star Game.All-NBA (20) Any player on your Dynasty Mode team makes the All-NBA team.
Clutch (20) On Superstar difficulty vs. the CPU, make two free throws in a row with less than two minutes remaining.
G.O.A.T. (60) Win by at least 20 points in solo game on Superstar difficulty vs. the CPU.
Shock the World (30) Defeat Team USA in a solo match in the FIBA World Championship tournament vs. the CPU.
The Grinder (100) Play 20 ranked matches online.
Cool Off (50) Shut down a hot ‘Shot Streak‘ by keeping his point total under 10 vs. the CPU (minimum 10 min. Q).Left 4 Dead Cheats
Cheat: Cheat List
To insert the cheats below, call-up the in-game cheats console by pressing the tilde (~) key. Then, insert the cheats on the left for the corresponding result on the right.
- Buddha - Receive damage, but will not die
- give X - Give any item (where X = item name)
- god - God Mode
- impulse 10 - All weapons and ammunition
- nb_blind 1 - Infected cannot see you
- noclip - Walk through walls
- sv_infinite_ammo 1 - Infinite ammunition (no reloads)
- warp_all_survivors_here - Teleports all survivors to your position
- warp_all_survivors_to_checkpoint - Teleports all survivors to the nearest checkpoint
- warp_all_survivors_to_finale - Teleports all survivors to the finale
- warp_to_start_area - Teleport yourself to the next chapter
Tweak IE7 to run Faster
There are 4 tweaks for IE7 so that the loading of site is faster. Doing these tricks will not hamper your security or setting changes. These tricks are done only on the unnecessary overheads on the IE7.
1) Turn off Phishing Filter : This feature is only protective to you to access the junk or malefic sites, it has been found that this feature slows down the loading of webpage. I think one can surf without this extra costly protection. It can be disabled here in IE7:
Tools > Phishing Filter > Turn off automatic website checking, there turn it off.
2) Disble automatically checking for RSS feeds. Most users are not availing this facility provided in IE7, so it's better to turn it off. How to do it:
Tools > Internet Options > Content > Feeds > Settings > uncheck all the boxes shown there.
3) Remove "ClearType" useage in IE7, it will slow IE7 performance. Disable the Cleartype in IE7:
Tools > Internet Options > Advanced > find the option "ClearType for HTML*" > uncheck that.
4) Disable the "SSVHelper Class plugin": This plugin causes browsing delays, do it here
Tools > Manage Add-ons > Enable or Disable Add-ons > Select "SSVHelper Class", click the Disable button, and then click OK.
How to Check Your Anti-Virus Software Working Properly Or Not.
This article is best in checking out whether your antivirus software is running at its best or not. It was not known to many that how to check the antivirus software they are using is working properly or not. Please read the article for the details.
1Click Start --> Open Notepad -->
Step2Copy the code exactly in the notepad :
X5O!P%@AP[4\PZX54(P^)7CC)7}$EICAR-STANDARD-ANTIVIRUS-TEST-FILE!$H+H*
Step3Now Save it with the name fakevirus.exe in any of your folder/drives.
Step4If this file got deleted immediately...then it means that your antivirus is working properly and updated !!
Step5If this doesnt happens and you see the saved file in that folder do right click the file and select scan with your installed antivirus and if the scan shows the file then it means your antivirus is working properly but not updated with a new version, as best antivirus softwares detect any virus (at the same second when you save the same in your system)without your effort of going to specified folder and scanning the folder.
Step6If it doesnt shows any kind of threats then you need to change your antivirus software immediately with some good one with the new version.
Grand Theft Auto IV Unlockables
| Unlockable | How to Unlock |
|---|---|
| Off The Boat (5) | Complete the first mission. |
| One Hundred And Eighty (10) | In a darts game score 180 with 3 darts. |
| Pool Shark (10) | Beat a friend at pool. |
| King of QUB3D (15) | Beat the High Score in QUB3D. |
| Finish Him (15) | Complete 10 melee counters in 4 minutes. |
| Genetically Superior (25) | Come first in 20 singleplayer street races. |
| Wheelie Rider (30) | Do a wheelie lasting at least 500 feet on a motorbike. |
| Gobble Gobble (10) | Score 3 strikes in a row, a turkey, in 10-pin bowling. |
| Driving Mr. Bellic (10) | Unlock the special ability of taxi. |
| Rolled Over (30) | Do 5 car rolls in a row from one crash. |
| Walk Free (50) | Lose a 4 star wanted rating by outrunning the cops. |
| Courier Service (10) | Complete all 10 package delivery jobs. |
| Retail Therapy (10) | Unlock the special ability of buying guns from a friend. |
| Chain Reaction (20) | You must blow up 10 vehicles in 10 seconds. |
| One Man Army (40) | Survive 5 minutes on 6 star wanted level. |
| Lowest Point (5) | Complete mission "Roman's Sorrow". |
| Order Fulfilled (10) | Complete all 10 Exotic Export orders. |
| Manhunt (15) | Complete the most wanted side missions from the police computer. |
| Cleaned The Mean Streets (20) | Capture 20 criminals through the police computer. |
| Fed The Fish (5) | Complete the mission "Uncle Vlad". |
| It'll Cost Ya (5) | Complete a taxi ride without skipping from one island to another. |
| Sightseer (5) | Fly on all helicopter tours of Liberty City. |
| Warm Coffee (5) | Successfully date a girl to be invited into her house. |
| That's How We Roll! (10) | Unlock the special ability of helicopter. |
| Half Million (55) | Reach a balance of $500,000. |
| Impossible Trinity (10) | Complete mission "Museum Piece". |
| Full Exploration (20) | Unlock all the islands. |
| You Got The Message (20) | Deliver all 30 cars ordered through text message. |
| Dare Devil (30) | Complete 100% of the unique stunt jumps. |
| Assassin's Greed (20) | Complete all 9 assassin missions. |
| Endangered Species (50) | Collect every hidden package in the game. |
| Under The Radar (40) | Fly underneath the main bridges in the game that cross water with a helicopter. |
| Dial B For Bomb (10) | Unlock the special ability of phoning for a bomb to be placed. |
| Gracefully Taken (10) | Complete mission "I'll Take Her". |
| Liberty City (5) (20) | After meeting all possible friends, the ones left alive all like you above 90%. |
| No More Strangers (5) | Meet all random characters. |
| That Special Someone (10) | Complete mission "That Special Someone". |
| You Won! (60) | Complete the final mission. |
| Liberty City Minute (30) | Complete the story missions in less than 30 hours. |
| Key To The City (100) | Achieve 100% in "Game progress" statistic. |
| Teamplayer (10) | Kill 5 players who are not in your team, in any ranked multiplayer team game. |
| Cut Your Teeth (5) | Earn a personal rank promotion in multiplayer. |
| Join The Midnight Club (10) | Win a ranked multiplayer race without damaging your vehicle too much and with damage enabled. |
| Fly The Co-op (15) | Beat our time in ranked versions of "Deal Breaker", "Hangman's NOOSE" and "Bomb da Base II". |
| Taking It For The Team (10) | Be on the winning team in all ranked multiplayer team games. |
| Top Of The Food Chain (10) | Kill 20 players with a pistol in a ranked multiplayer deathmatch. |
| Top The Midnight Club (20) | Come first in 20 different ranked standard multiplayer races. |
| Wanted (20) | Achieve the highest personal rank in multiplayer. |
| Auf Wiedersehen Petrovic (30) | Win all ranked multiplayer variations, all races and "Cops 'n Crooks", as both sides. |
| Let Sleeping Rockstars Lie (10) | Kill a Rockstar developer in a ranked multiplayer match. |
GTA IV Cheats
Dial all cheats into Niko's cell phone:
Health
482-555-0100
Armor
362-555-0100
Weapons #1
(Baseball Bat, Handgun, Shotgun, MP5, M4, Sniper Rifle, RPG, Grenades.)
486-555-0100
Weapons #2
(Knife, Molotovs, Handgun, Shotgun, Uzi, AK47, Sniper Rifle, RPG)
486-555-0150
Remove Wanted Level
(Blocks achievement "Walked free")
267-555-0100
Raise Wanted Level
267-555-0150
Change Weather/Brightness
468-555-0100
Spawn Annihilator
359-555-0100
Spawn Jetmax
938-555-0100
Spawn NRG-900
625-555-0100
Spawn Sanchez
625-555-0150
Spawn FIB Buffalo
227-555-0100
Spawn Comet
227-555-0175
Spawn Turismo
227-555-0147
Spawn Cognoscenti
227-555-0142
Spawn SuperGT
227-555-0168
Complete Map - (with weapon, health, armor, pigeon, etc. locations)
Enter the URL "www.whattheydonotwantyoutoknow.com" into computers in the game
NBA 2K9 Cheats - Achievements
Here we are, still two weeks away from the actual release of NBA 2K9 and we are already starting to get leaks of information. Believe us guys, this is a VERY good sign that things will start to flow really quickly once the game actually comes out.
No, these are not actually NBA 2K9 Cheats but this is a list of achievements and for them to be out this soon means we can expect to start getting cheats codes any time. Below is the list of achievements and their associated GameScore points.
Achievements
- 30 Assists (20 points): Record 30 assists or more with any team.
- 10 Blocks (20 points): Record 10 blocks or more with any team.
- 15 Steals (20 points): Record 15 steals or more with any team.
- Rebound Margin +7 (20 points): Win the rebound battle by a margin of +7 with any team.
- 15 Threes (15 points): Make 15 three pointers or more with any team.
- Defensive FG% (15 points): Hold the opposing team’s FG% below 40% with any team.
- Lights Out (15 points): FG% over 55% for the game [minimum 40 FGA's] with any team.
- Track Meet (15 points): Score at least 15 fastbreak points with any team.
- Second Unit (15 points): Score at least 40 bench points with any team.
- Inside Domination (20 points): Score at least 60 points in the paint with any team.
- Good Hands (20 points): Record 20 assists with no more than 5 turnovers with any team.
- All-Hustle (15 points): Record at least 10 offensive rebounds, 5 blocks and 5 steals with any team.
- All-Heart (15 points): Start the 4th period losing by 10 or more points and win the game with any team.
- 3-For-All (20 points): Make at least 10 3pt FG’s while shooting at least 45% from 3pt range with any team.
- Ice Water (15 points): FT% over 85% with at least 15 FTA’s with any team.
- Lockdown (20 points): Record at least 10 blocks and 10 steals with any team.
- Spurs vs. Suns (15 points): User controlled team must win this matchup on All-Star difficulty.
- Suns vs. Mavericks (15 points): User controlled team must win this matchup on All-Star difficulty.
- Celtics vs. Lakers (15 points): User controlled team must win this matchup on All-Star difficulty.
- Lakers vs. Clippers (15 points): User controlled team must win this matchup on All-Star difficulty.
- Cavaliers vs. Wizards (15 points): User controlled team must win this matchup on All-Star difficulty.
- East vs. West (15 points): User controlled team must win this matchup on All-Star difficulty.
- LeBron James (25 points): Record at least 35 points, 9 rebounds and 9 assists with LeBron James.
- Kobe Bryant (25 points): Record at least 40 points, 5 rebounds and 5 assists with Kobe Bryant.
- Dwyane Wade (25 points): Record at least 26 points, 5 rebounds and 7 assists with Dwyane Wade.
- Allen Iverson (25 points): Record at least 30 points, 8 assists and 3 steals with Allen Iverson.
- Dwight Howard (25 points): Record at least 20 points, 15 rebounds and 3 blocks with Dwight Howard.
- Steve Nash (25 points): Record at least 20 points and 15 assists with Steve Nash.
- Gilbert Arenas (25 points): Record at least 35 points, 3 steals and 5 threes with Gilbert Arenas.
- Chris Paul (25 points): Record at least 20 points, 10 assists and 3 steals with Chris Paul.
- Kevin Garnett (25 points): Record at least 20 points, 13 rebounds and 5 assists with Kevin Garnett.
- Carmelo Anthony (25 points): Record at least 40 points and 8 rebounds with Carmelo Anthony.
- Yao Ming (25 points): Record at least 30 points, 12 rebounds and 4 blocks with Yao Ming.
- Chris Bosh (25 points): Record at least 30 points, 10 rebounds and 2 blocks with Chris Bosh.
- Sprite Slam Dunk (35 points): Win the Sprite Slam Dunk Contest using LeBron James.
- Dunk-Off (35 points): Defeat any challenger in a Dunk-Off.
- Trivia (35 points): Answer 15 trivia questions correctly.
- Create Player (10 points): Use the Create Player feature.
- 3pt Shootout (15 points): Win the 3pt Shootout.
- 2K Beats Playlist (10 points): Create a 2K Beats playlist.
- Online Ranked Game (15 points): Win one online ranked game.
- 3 Online Ranked Streak (15 points): Win 3 online ranked games in a row.
- 5 Online Ranked Streak (20 points): Win 5 online ranked games in a row.
- 5 Online Ranked Wins (15 points): Win 5 online ranked games.
- 10 Online Ranked Wins (25 points): Win 10 online ranked games.
- 20 Online Ranked Wins (30 points): Win 20 online ranked games.
- Team 2K (20 points): Beat a Team 2K member in an online game.
- Good Teammate (20 points): Earn a positive "teammate rating" in the online Team-Up Mode.
- Better to Give (20 points): Share any file type through 2K Share.
- Reel Critic (10 points): Download a reel from ReelViewer and rate it.
That should keep you busy for a little while.
Thursday, July 23, 2009
"Task Manager has been disabled by your administrator"
Symptom
When you try to open Task Manager, the following error may occur:
Task Manager has been disabled by your administrator
Resolution
This error is caused if the DisableTaskMgr restriction is enabled. To enable Task Manager, try one of these methods:
IMPORTANT: If this restriction was enabled in your system without you doing anything or without your knowledge, then it's highly likely that a Virus has blocked the usage of Task Manager in your system by enabling the DisableTaskMgr policy via the registry. I strongly suggest that you perform a thorough checkup of your system immediately. Steps listed in the Resolution section of this article helps you unblock the Task Manager, but that does not remove the Virus (if any) from your system.
Method 5
Method 1
Click Start, Run and type this command exactly as given below: (better - Copy and paste)
Method 2
- Click Start, Run and type Regedit.exe
- Navigate to the following branch:
HKEY_CURRENT_USER \ Software \ Microsoft \ Windows \ CurrentVersion \ Policies\ System
- In the right-pane, delete the value named DisableTaskMgr
- Close Regedit.exe
Method 4: Using Group Policy Editor - for Windows XP Professional
- Click Start, Run, type gpedit.msc and click OK.
- Navigate to this branch:
User Configuration / Administrative Templates / System / Ctrl+Alt+Delete Options / Remove Task Manager
- Double-click the Remove Task Manager option.
- Set the policy to Not Configured.
Method 5
Download and run this REG fix and double-click it.
How to Make Your Computer Run Fast
A slow computer is an extremely common and frustrating problem. Not only does it prevent you from being able to use your computer for a number of different things, but it can also prevent you from being able to do many of the more enjoyable things with your PC. Many people have to put up with this problem, but luckily, there's actually a very simple way to fix it...
You see, there's a part of your system which hardly anyone knows about that causes your computer to run slow. This part of your system is called the 'registry' and is the central database for Windows, where your computer stores all the settings and options for your machine. Everything from your Internet favorites to your desktop wallpaper are kept in this database, making it one of the most important parts of Windows. It's so important that your computer is constantly using 100's of registry files whenever you use your PC.
This is okay, but this is actually the main reason why computers run slow.... Because when your PC uses 100's of these registry files, it actually becomes confused and ends up saving many of them in the wrong way. This makes them corrupt and damaged, which makes it harder for your computer to read them, slowing it down. Many computers have 1,000's of these damaged files, which your computer can do nothing with unless it deciphers them.
Think of these corrupt files as books, which all have their pages mixed up. Your computer has to spend longer trying to read these books, which slows it down. It ends up slowing it down more and more with the more files that are damaged. So to fix this problem, and to speed up your computer dramatically, you just need to be able to fix all the damaged files that are slowing it down.
And to do that, you just need to be able to use a registry cleaner to scan through the registry and fix all the problems that are in there. These cleaners scan each registry file and if they find one which is actually corrupt, it will actually replace or fix it for you. Because they are totally automated, these tools actually give you the ability to speed up your computer without the need to do anything yourself. They work surprisingly well, too.
Microsoft Windows Registry Errors - Learn How to Fix Windows Registry Errors Today
When Microsoft Windows registry errors suddenly appear on your computer, you must know that a person does not really have a lot of options. The first option is said to be the easy way out because it just involves you ignoring the problems shown to you by your computer. But as you know, this is not the best thing to do in situations like this because it just tends to worsen the problems. Another option is for you to manually repair the errors with applications known as a 'Registry Editor'. Even with the freedom to use this option, people rarely do this because of fear of aggravating the problems of their system. The third option seems to be the most reliable one because many people are more comfortable of using it. This third option includes using software to automatically repair the errors in your computer.
Having said all of the options, it is safe to say that all you need to do is find a reliable and effective registry cleaner. Aside from the effectiveness of the cleaner that you will look for, you must also keep in mind that it should also be easy to use. Choose a registry cleaner which will not ask you to do the job yourself because then, it will only defeat the purpose of you finding a cleaner. Make sure that you choose the cleaner which will take care of all the Microsoft Windows registry errors. This will make your job easier because you will know that you do not have to involve yourself with decisions involving technical stuff. Another way by which a person can fix all Microsoft Windows registry errors is by accessing the 'System Restore' feature of your computer. Most people do not know that this method can fix the registry errors in your computer without corrupting the data that are stored in your hard drive. System restore works by going back to the state of your system on a specific date and applying them to the system so as to eliminate all the errors present. You can locate this feature from the Start menu and then choosing 'all programs'. You should go then to the 'Accessories' option and then choosing 'System Tools'; there you will find the system restore option.
It really brings a lot of pressure to you when errors are alerted to you by your computer, but you should remember that these Microsoft Windows registry errors can be fixed when you are equipped with the right information.
Windows Vista Blue Screen of Death (BSOD) - Get a Solution to Your Problem Quickly!
Often the solution to blue screen of death in any windows operating system is by restarting the system (temporary) or reinstalling the system (effective for months), but if you are looking for a better solution to fix your Windows Vista blue screen of death or other windows system, all you have to do is fix your blue screen death by using a specialized registry cleaner or prevent it before happening.
As you know Windows Vista blue screen of death is a display of blank screen on your monitor because of unknown critical problems encountered by your system. You can do the registry repair for your windows vista in less than 11 minutes. This new software can make your computer error free and fast running. After running this registry clean up you won't experience any errors. You can fix Windows Vista blue screen of death as easy as 1,2,3...
The Internet is filled with a lot of interesting software and almost every one is tempted to get exciting and free software off the Internet, such as videos, screen savers, free software, back-ground music, pictures and almost anything. You are can do this as Windows Vista is a really good computer operating system which makes every thing very fast. But whenever you download such programs or stuff into your computer, nobody understands that your computer is at risk.
There is a possibility for you to unknowingly that some executable files can crash with other programs. If this kind of tweaking happens in your computer, you may not be able to operate that particular file that is needed for your windows. This will result in the Windows Vista blue screen of death (BSOD). There is an extremely effective solution to this problem and it's a good registry cleaner to kill this problem if it already happens. Use good registry cleaner software regularly can prevent this so called BSOD or "beginning of physical memory dump" from happening.
You can fix this problem, Windows Vista Blue Screen of Death for a short term basis by rebooting the system. But remember this is not a permanent solution. You can even lose a large amount of critical data after your last saving procedure. Sometimes rebooting won't work; you may be required to install the complete operating system once again. To make it worse you may have to replace some of your hardware as well. But in this method, you will lose the entire data stored in your computer for sure.
Make it a practice to delete all the unwanted programs and uninstalled programs completely from your system. Check you disks regularly for fragmentation. Delete all windows and internet temporary files, and intruder files using Internet options in the tools bar. It is very important to do the clean up of your disk for your hard drive. You can also use a good registry cleaner and forget doing all the above steps. With all the tools given you only need couple of clicks to remove all useless files that use up your memory.
The registry cleaner will scan all the areas of your system and will wipe out all the invalid entries stored in the system that cause Windows Vista blue screen of death. After running registry cleaner, your system can restore its original speed and performance. You can enjoy downloading again and again. It will prevent the dreaded appearance of the physical memory dump at any unexpected moment. You won't lose your data in the middle of doing something really important. One time installation and life time benefits that is what you will get after installing this registry cleaner software.
How to Upgrade your Video Card
STEP 1.
Determine the video socket type on your mother board.
There are 3 main types.
PCI, AGP, PCI-E
Look at the photo comparison and write down the type of card you have.
If you have PCI or PCI-E, you are set. You can jump to step 5.
STEP 2.
If you have AGP, sit down and take a deep breath. Let it out. ok here wee go. You must determine which version of AGP you have. Over the many years of AGP, card-makers improved the technology and also changed the socket of agp along the way.
STEP3.
In the year 1999-2000, the agp style was brand new and was known as 1X. In 2002, the upgrade began and they came at a crazy rate. the only people in a jam are those who own 1X machines and there is hope for you. I have found at least 2 cards that work with 1X machines. I will share those card names in step 5.
There are 3 main types. 1x, 2X-4X, 4X-8X
many card makers will overlap many versions but some will only support a handful of speeds.
STEP 4.
he best place to start is with the card connector appearance or your documentation from the computer maker. Since documentation can be hard to find, lets look at the video card's edge connector.
The AGP standard uses notches in the card's edge to force the user to use the right card. Most of the time, this will be all you need, but there are times when you just need to know what your computer will support. (depending on what the video card maker lists as supported AGP speeds.)
STEP 5.
The biggest (but not the only) difference between the AGP style is the voltage available to the video card. Some motherboards actually offer more than one voltage and can handle more card types.
Luckily there are some card makers who offer video cards that can accept more than one voltage level and they auto adjust as needed.
Very few cards will list 1X as a feature. Most will say 2x-8x or 4x-8x.
So to sum up..
If you have a 1X card, look at the
Matrox Millenium G450 16MB AGP
Connect3D Radeon 9250se
I have these 2 cards and they are both 1X-4x. Or just use a PCI Card if needed. If you have a computer with 4x-8x ability, you can pick most any new card.
STEP 6.
Ok so we have purchased a new video card.
Lets do the install process.
This can be trickier that you might imagine. We want to replace the old video drivers with new ones but we are using the old ones. Here's the best process to use.
STEP 7.
Right-click "My computer" > pick Properties > Hardware > Device Manager.
Click display adapter and right-click your video card, Pick UNINSTALL
shut your computer down.
Remove the power cord
Open the case
Locate the card with your video connection on it
Remove the screw or plastic clip that holds the card in place.
STEP 8.
Once the card is removed you can easily insert the new card. Make sure the card snaps deep into place.
STEP 9.
Put everything back together.
Put the screw or plastic clip back on
close the case
put the power cord back on
connect a PC monitor
turn ON the PC and watch the screen.
If all has gone well, you will see video on your screen.
STEP 10.
If your computer beeps and puts up a note about a change, press F# to continue, please follow the prompts.
STEP11.
Insert the CD that came with your video card and install the driver.
Subscribe to:
Comments (Atom)


