DISABLE INDEXING SERVICES
Indexing Services is a small little program that uses large amounts of RAM and can often make a computer endlessly loud and noisy. This system process indexes and updates lists of all the files that are on your computer. It does this so that when you do a search for something on your computer, it will search faster by scanning the index lists. If you don't search your computer often, or even if you do search often, this system service is completely unnecessary. To disable do the following:
1. Go to Start
2. Click Settings
3. Click Control Panel
4. Double-Click Add/Remove Programs
5. Click the Add/Remove Window Components
6. Uncheck the Indexing services
7. Click Next
OPTIMISE DISPLAY SETTINGS
Windows XP can look sexy but displaying all the visual items can waste system resources. To optimise:
1.Go to Start
2. Click Settings
3. Click Control Panel
4. Click System
5. Click Advanced tab
6. In the Performance tab Click Settings
7. Leave only the following ticked:
- Show shadows under menus
- Show shadows under mouse pointer
- Show translucent selection rectangle
- Use drop shadows for icons labels on the desktop
- Use visual styles on windows and buttons
DISABLE PERFORMANCE COUNTERS
Windows XP has a performance monitor utility which monitors several areas of your PC's performance. These utilities take up system resources so disabling is a good idea.
To disable:
1. download and install the Extensible Performance Counter List
2.Then select each counter in turn in the 'Extensible performance counters' window and clear the 'performance counters enabled' checkbox at the bottom.button below.
SPEEDUP FOLDER BROWSING
You may have noticed that everytime you open my computer to browse folders that there is a slight delay. This is because Windows XP automatically searches for network files and printers everytime you open Windows Explorer. To fix this and to increase browsing significantly:
1. Open My Computer
2. Click on Tools menu
3. Click on Folder Options
4. Click on the View tab.
5. Uncheck the Automatically search for network folders and printers check box
6. Click Apply
7. Click Ok
8. Reboot your computer
IMPROVE MEMORY USAGE
Cacheman Improves the performance of your computer by optimizing the disk cache, memory and a number of other settings.
Once Installed:
1.Go to Show Wizard and select All
2.Run all the wizards by selecting Next or Finished until you are back to the main menu. Use the defaults unless you know exactly what you are doing.
3.Exit and Save Cacheman
4.Restart Windows
OPTIMISE YOUR PAGEFILE
If you give your pagefile a fixed size it saves the operating system from needing to resize the page file.
1. Right Click on My Computer and select Properties
2. Select the Advanced tab
3. Under Performance choose the Settings button
4. Select the Advanced tab again and under Virtual Memory select Change
5. Highlight the drive containing your page file and make the initial Size of the file the same as the Maximum Size of the file.
Windows XP sizes the page file to about 1.5X the amount of actual physical memory by default. While this is good for systems with smaller amounts of memory (under 512MB) it is unlikely that a typical XP desktop system will ever need 1.5 X 512MB or more of virtual memory. If you have less than 512MB of memory, leave the page file at its default size. If you have 512MB or more, change the ratio to 1:1 page file size to physical memory size.
RUN BOOTVIS - IMPROVE BOOT TIMES
BootVis will significantly improve boot times
1. Download and Run
2. Select Trace
3. Select Next Boot and Driver Trace
4. A Trace Repetitions screen will appear, select Ok and Reboot
5. Upon reboot, BootVis will automatically start, analyze and log your system's boot process. When it's done, in the menu go to Trace and select Optimize System
6. Reboot.
7. When your machine has rebooted wait until you see the Optimizing System box appear. Be patient and wait for the process to complete
REMOVE THE DESKTOP PICTURE
Your desktop background consumes a fair amount of memory and can slow the loading time of your system. Removing it will improve performance.
1. Right Click on Desktop and select Properties
2. Select the Desktop tab
3. In the Background window select None
4. Click Ok
REMOVE FONTS FOR SPEED
Fonts, especially TrueType fonts, use quite a bit of system resources. For optimal performance, trim your fonts down to just those that you need to use on a daily basis and fonts that applications may require.
1. Open Control Panel
2. Open Fonts folder
3. Move fonts you don't need to a temporary directory (e.g. C:\FONTBKUP?) just in case you need or want to bring a few of them back. The more fonts you uninstall, the more system resources you will gain.
DISABLE UNNECESSARY SERVICES
Because Windows XP has to be all things to all people it has many services running that take up system resources that you will never need. Below is a list of services that can be disabled on most machines:
Alerter
Clipbook
Computer Browser
Distributed Link Tracking Client
Fast User Switching
Help and Support - (If you use Windows Help and Support leave this enabled)
Human Interface Access Devices
Indexing Service
IPSEC Services
Messenger
Netmeeting Remote Desktop Sharing (disabled for extra security)
Portable Media Serial Number
Remote Desktop Help Session Manager (disabled for extra security)
Remote Procedure Call Locator
Remote Registry (disabled for extra security)
Remote Registry Service
Secondary Logon
Routing & Remote Access (disabled for extra security)
Server
SSDP Discovery Service - (Unplug n' Pray will disable this)
Telnet
TCP/IP NetBIOS Helper
Upload Manager
Universal Plug and Play Device Host
Windows Time
Wireless Zero Configuration (Do not disable if you use a wireless network)
Workstation
To disable these services:
Go to Start and then Run and type "services.msc"
Doubleclick on the service you want to change
Change the startup type to 'Disable"
TURN OFF SYSTEM RESTORE
System Restore can be a useful if your computer is having problems, however storing all the restore points can literally take up Gigabytes of space on your hard drive. To turn off System Restore:
Open Control Panel
Click on Performance and Maintenance
Click on System
Click on the System Restore tab
Tick 'Turn off System Restore on All Drives'
Click 'Ok'
DEFRAGMENT YOUR PAGEFILE
Keeping your pagefile defragmented can provide a major performance boost. One of the best ways of doing this is to creat a separate partition on your hard drive just for your page file, so that it doesn't get impacted by normal disk usage. Another way of keeping your pagefile defragmented is to run PageDefrag. This cool little app can be used to defrag your pagefile, and can also be set to defrag the pagefile everytime your PC starts. To install:
Download and Run PageDefrag
Tick "Defrag at next Reboot",
Click "Ok"
Reboot
SPEEDUP FOLDER ACCESS - DISABLE LAST ACCESS UPDATE
If you have a lot of folders and subdirectories on your computer, when you access a directory XP wastes a lot of time updating the time stamp showing the last access time for that directory and for ALL sub directories. To stop XP doing this you need to edit the registry. If you are uncomfortable doing this then please do not attempt.
Go to Start and then Run and type "regedit"
Click through the file system until you get to "HKEY_LOCAL_MACHINE\System\CurrentControlSet\C ontr ol\FileSystem"
Right-Click in a blank area of the window on the right and select 'DWORD Value'
Create a new DWORD Value called 'NtfsDisableLastAccessUpdate'
Then Right Click on the new value and select 'Modify'
Change the Value Data to '1'
Click 'OK'
DISABLE SYSTEM SOUNDS
Surprisingly, the beeps that your computer makes for various system sounds can slow it down, particularly at startup and shut-down. To fix this turn off the system sounds:
Open Control Panel
Click Sounds and Audio Devices
Check Place volume icon in taskbar
Click Sounds Tab
Choose "No Sounds" for the Sound Scheme
Click "No"
Click "Apply"
Click "OK"
IMPROVE BOOT TIMES
A great new feature in Microsoft Windows XP is the ability to do a boot defragment. This places all boot files next to each other on the disk to allow for faster booting. By default this option in enables but on some builds it is not so below is how to turn it on.
Go to Start Menu and Click Run
Type in "Regedit" then Click ok
Find "HKEY_LOCAL_MACHINE\SOFTWARE\Microsoft\Dfrg\Bo otOp t imizeFunction"
Select "Enable" from the list on the right
Right on it and select "Modify"
Change the value to "Y to enable"
Reboot
Saturday, July 25, 2009
Increase your Internet Speed Up To 375%...No Software...Its a Trick!!!
Believe Me It Really Worked For Me....Try It...Will Just Take 2 Mins....
Hello Guys,
This is a short tutorial on how to increase your internet by 375% Faster or higher.
So That You Can:
Increase your browsing experience
Play online games LAG free
Load videos almost instantly
Turn your slow internet connection into Broadband DSL or even T1
Download anything faster with our "intelligent packet configurator"
Increase Speeds Up To 375% Faster!
1) Open Mozilla Firefox.
2) In addreas bar type: "about:config"
3)Look for were it says "network.http.pipelining" to TRUE
(Double Click it until it says TRUE)
4)Look for "network.http.proxy.pipelining" to TRUE
(Same way as stated above)
5) Now. Right-Click Anywere then click "Create New" Then "Integer". Name it "nglayout.initialpaint.delay"
Then Click Ok,then put the number "0" (Zero) in the next box
6) Click OK,
7) Restart Firefox.
8) Feel The Difference in Speed
Hello Guys,
This is a short tutorial on how to increase your internet by 375% Faster or higher.
So That You Can:
Increase your browsing experience
Play online games LAG free
Load videos almost instantly
Turn your slow internet connection into Broadband DSL or even T1
Download anything faster with our "intelligent packet configurator"
Increase Speeds Up To 375% Faster!
Code:
PLEASE NOTE: Only works for Mozilla Firefox
2) In addreas bar type: "about:config"
3)Look for were it says "network.http.pipelining" to TRUE
(Double Click it until it says TRUE)
4)Look for "network.http.proxy.pipelining" to TRUE
(Same way as stated above)
5) Now. Right-Click Anywere then click "Create New" Then "Integer". Name it "nglayout.initialpaint.delay"
Then Click Ok,then put the number "0" (Zero) in the next box
6) Click OK,
7) Restart Firefox.
8) Feel The Difference in Speed
Reformatting with a .iso on a USB drive
Installing Windows XP or any other operating system is easy if you have a USB optical disc drive. But if all you’ve got is a USB flash drive and another computer with a DVD burner, you can still install Windows XP (or many Linux distributions for that matter) on a disc drive-less ultraportable like the HP Mini-Note or the Asus Eee PC. After spending most of Saturday installing Windows XP on my HP Mini-Note I thought I’d share my results with you. Remember, your results may very, so while these are the steps that worked for me, they may not work for you. For example, depending on the version of Windows XP you are using, you may need a different hotfix to install the audio drivers.
There were two resources that were extraordinarily helpful. Bsumpter at MiniNoteUser wrote up an excellent tutorial for installing XP on a Mini-Note, and EeeGuides has a great walkthrough for installing XP on an Eee PC using a flash drive. By combining these methods and a few other, I was able to setup my Mini-Note with a Windows partition, a spare partition for installing Linux, and a large data partition for shared files.
Here’s what you’ll need:
- 1 USB flash drive, 1GB or larger
- 1 Windows XP installation disc
- Assorted files that I’ll describe as we go along.
Preparing the flash drive
First up, we need to prepare the flash drive.
- Download and unzip this file, which should contain 2 folders: 1 titled Bootsect, and the other USB_prep8.
- Navigate to the USB_prep8 folder and click on usb_prep8.cmd. This will bring up a Windows console window.
- Press any key to continue and a PeToUSB window will open.
- Make sure your flash drive is selected, and click start to format your flash drive.
- When the format is complete, click OK, but do not close the PeToUSB window or the Windows Console.
- Open a new console window by typing “cmd” into the run box in the Windows Start Menu.
- Find your Bootsect folder (if you’re not used to DOS commands, you can type “dir” to list directories and files, type “cd foldername” to navigate to a folder name – called foldername in this example, and if there’s a long folder name you can save time by typing the “cd” and just the first few letters and then hitting the Tab key to fill in the rest of the name).
- Once you’re in the Bootsect folder, type “bootsect.exe /nt52 g:” if “g” is the letter assigned to your flash drive. If it’s E, then change the letter to e. If it’s Z, make it z. Get it?
- When this is done, you should see a message letting you know that the bootcode was updated, and you can close this console window (but not the other console window).
- Close the PeToUSb Window, but make sure not to close the remaining console window yet
- You should now see a list of 8 options in the console.
- Select one and find the drive with your Windows installation disc.
- Select 2 and pick a random drive letter (but not one that’s already on your PC, since this will be a virtual drive used for copying your files).
- Select 3 and enter the drive letter for your USB flash drive.
- Select 4 and follow the rest of the on-screen directions and you should be all set.
The process should take about 15-20 minutes. When it’s done, you should have a bootable USB stick that you can use to install Windows XP the same way you would if you had a CD/DVD drive.
A few notes here. First of all, there’s a chance you may get down to step 15 and the program will tell you that it can’t create the virtual drive. This may happen if you’ve already gone through the whole process and are trying to do it again to fix problems. The solution seems to be rebooting your computer and trying again. Or at least that’s what worked for me.
Second, if you use NLite to shrink/slipstream/otherwise modify your Windows XP installation file, make sure you do not remove “manual installation files,” or your USB stick will be pretty much useless.
Installing XP on the Mini-Note
Now it’s time to load Windows XP onto your Mini-Note. If you have a USB CD/DVD drive, you probably skipped all the stuff above, and that’s fine. Most of the following steps should work as well. These instructions should work whether you’re installing Windows XP on a system that came preloaded with SUSE or Windows Vista.
- Insert your USB flash drive in one of the USB ports on your Mini-Note.
- Power on your computer and hit F9 to bring up a boot device selection window.
- Choose your flash drive, or if you’re using a USB optical disc drive, select that instead.
- Select 2 for a text-based installation.
- Make sure to delete all of the partitions on the hard drive. While you may have some success creating separate partitions on your hard drive using this method, I did not. If you find yourself with a Hal.dll or bootloader missing error when you’re finished, there’s a good chance it’s because you did not delete all of the partitions. Note that I will be providing instructions in the next section for partitioning your hard drive after installing Windows XP, so you can still create a Linux partition later.
- Create one large NTFS partition (using the quick option will save you a lot of time)
- Follow the on-screen directions.
- At least once during the install process, you will be prompted to reboot your computer. If you try to let it boot from the hard drive, you’ll get an error message. What you need to do is hit F9 again when it reboots and this time select option 1 for a GUI setup.
- Once you’re done installing XP, you may notice that you are unable to boot into Windows from the hard drive. If you have the USB disk installed, again hit F9, and select the GUI option again. Windows should start. You’ll need to edit the boot.ini file:
- Type “msconfig” into the run box in the start menu
- Select the BOOT.INI tab
- First, try the “Check All Boot Paths,” option. This may solve your problem by finding and removing the incorrect boot settings.
- You may also need to edit the boot.ini file manually if it doesn’t read something like ‘multi(o)disk(0)rdisk(o)partition(1)\Windows=”Windows XP Pro” /fastdetect’
- The most likely problem is that wrong partition is selected. It may say (0) or (2) or something like that. The steps below will show you how to backup and edit it.
- Open your System Properties by right-clicking on My Computer and choosing Properties. Alternately, you could type “sysdm.cpl” into the run box in the start menu
- Select the Advanced Tab
- Click the Settings option under Star
tup and Recovery - Click the button that says Edit to open up your boot.ini file in Notepad. It’s a good idea to save a backup now by selecting Save As, and saving the file to a place where you won’t forget it.
- Now you can (somewhat) safely edit the boot.ini file, changing the partition number or other settings to more closely resemble the one I listed above. Save your file, and hopefully you’ll be able to reboot without your USB stick.
Configuring Windows XP
Update: HP has added Windows XP drivers to its support page for the Mini-Note. You should try these official drivers before using the drivers listed below.
Now you should have a working Windows XP desktop, but you’ll find that you can’t connect to the internet via Ethernet or WLAN, you have no sound, and no support for the Fn keys. In order to fix these issues you’re going to need a few files. I’ve wrapped them all up into a ZIP file which you can download.
Once you’ve downloaded this file using another computer, you can copy it to your Mini-Note using a flash drive or SD card. Or if you’d rather just install the Ethernet drive so you can download the full 20MB ZIP file on your Mini-Note, you can find the Broadcom Ethernet Driver here. Once you unzip the files into a folder, you should have everything you need to get Windows XP up and running.
To install the Broadcom driver:
- Open the device manager by right-clicking on the My Computer dialog, selecting Hardware, and then Device Manager
- You should notice a bunch of little yellow alert icons. One will say something like Gigabit Ethernet. Honestly I forget exactly what I said, but it was pretty obvious.
- Right click on the Ethernet icon and select Update Driver.
- Select the Have Disk option, and navigate to the subfolder labeled win_xp_2k3_32 and choose the b57win32.inf file.
Now you should be able to connect to the internet, activate windows, and download most of the rest of the drivers you need from windows update. You’ll need to select the Custom option in order to get some of these updates. This should provide the drivers for your WLAN, touchpad, and other hardware.
Note that Windows Update didn’t automatically suggest the webcam driver for me. In order to install it, I had to find the webcam in the Device Manager (once all the other drivers, including the audio driver — see below — were installed, it was the only devices with a yellow flag next to it), and select the Install software automatically option. That did the trick.
Next, let’s enable sound. There does not appear to be a working audio driver for XP yet, but I’m holding out hope that HP will post one on its website when the company begins offering Mini-Note computers preloaded with Windows XP. I’m not going to hold my breath though. HP currently sells Mini-Notes preloaded with SUSE Enterprise, but there are no drivers or other support files on the HP web site for this configuration yet. Anyway, what you need to do is install a hotfix that will let you run the Windows Vista audio driver.
- Run the KB888111.exe patch. If you have Windows XP SP1, you can run the kb888111xpsp1.exe file instead. Note that you should do this before upgrading to Windows XP SP2 or SP3. In fact, when I tried to update my system from SP1 to SP2, I wound up with an unbootable system, so if you have a Windows XP Sp1 install disc, I’d recommend skipping SP2 altogether and jumping straight ahead to SP2. You can either grab a release candidate of SP3, wait a few days for Microsoft to release it officially, or if you look around I’m sure you can find it today.
- The file called sp38873.exe is the audio driver. Go ahead and click it and it will start to install the Vista audio drivers. Installation will fail because you’re not running Windows Vista, but the installer will create a folder that contains the driver.
- Find your sound device in the Device Manager. It should still be an unknown device with a big ole yellow flag next to it. Select update driver, choose the have disk option, and navigate to the folder where you unzipped your Vista audio drivers.
Keep in mind that this audio driver is not designed to run on Windows. And every time you boot your computer, a pop up window will alert you to this fact. Here’s how to disable this pop up:
- Type “msconfig” into the run box in the start menu.
- Select the startup tab.
- Uncheck the box next to smax4pnp.
- Click OK and reboot your computer.
Finally, you can install the HP QuickLuanch buttons to add support for the Fn keys. All you have to do here is click the file called HP buttons SP32280.exe and ignore any messages that pop up during this installation.
Now everything should work properly. You’ll probably want to adjust your display settings to use large or extra large fonts and large icons. The HP QuickLaunch utility also includes a Desktop Zoom utility which may help make your Mini-Note display a bit easier to see. But this computer has got a super-sharp display, so you may find that you need to tweak the default font sizes in other applications including Firefox if you want to be able to read your screen without squinting.
Using Parted Magic to create new partitions for Linux or other operating systems
While I tend to use Windows XP on a day to day basis, I wanted to make this a dual boot system so I can install Linux on a separate partition. Most Linux distributions aren’t very particular about where they’re installed. You can put them on a second or third partition, or even on an SD card in your card reader. But Windows likes to have the first partition all to itself. So while you may be able to use the Windows installer to set up partitions on the hard drive, I had more success installing Windows XP first, and then using Parted Magic to resize the Windows partition and create additional partitions.
The best time to do this is right after you install Windows. Your main partition will be fairly clean which will make the resizing operation go much more quickly. We’re talking about the difference between a minute or two and a half hour or more. You’ll also save yourself a lot of pain and heartache if something goes wrong and you wind up wiping your Windows partition, because you won’t have spent days loading and configuring all of your favorite programs yet.
I’m going to assume you’re still using a USB flash drive, but you can also use Parted Magic from a CD-ROM. Detailed instructions for setting up either a flash drive or a CD-ROM are available from the Parted Magic homepage. The main difference is that if you’re using a flash drive, you need to use SYSLINUX to make it bootable.
Once you’ve got your installation media:
- Reboot your Mini-Note with the flash drive or CD-ROM plugged into a USB port.
- Hit F9 and choose the device you want to boot from.
- From the boot menu, make sure to selection option 4: Failsafe Settings
- W
ait a few minutes until you’re presented with a command prompt that says “root@PartedMagic:~#” - Type “menu”
- Choose Xvesa (if you had tried almost anything other than option 4 in step 3, the system would try to boot using Xorg and your display would look all funny/unusable)
- You should now see a graphical user interface that looks a bit like this:
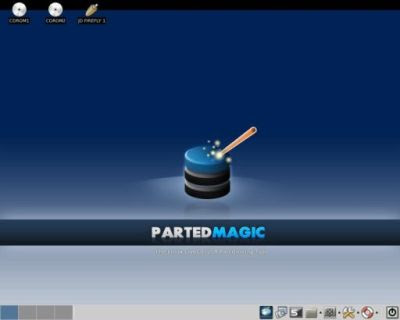
- Click the little blue icon on the bottom of the screen that says “VisParted.” This will bring up a partition manager
- Your primary hard drive should be listed as /dev/sda. But if it’s not, it shouldn’t be too hard to find since you probably only have one 120GB hard drive connected to your PC. Note that VisParted will say your hard drive is actually closer to 112GB.
- There should be one large partition labeled as /dev/sda1. You can right click on this and choose the resize/move option and then resize the partition either by dragging the edges or entering a value into the “new size” box.
- Once your Windows partition is shrunk, you an either leave the rest of your hard drive unpartitioned for future use, create an ext2, ext3 or other partition for Linux, or do something else altogether.
- Click the Apply button to execute.
- When Parted Magic is done working its magic, you can reboot your system by clicking on the shutdown menu at the bottom right side of your screen. If everything went properly, you should still be able to boot into Windows, but you’ll find that your Windows partition is smaller.

Personally, I decided to make a 25GB Windows XP partition for files and settings, a 15GB ext2 partition for installing Ubuntu or other operating systems, and I made a third NTFS partition for storing data that will be accessible no matter which OS I use.
Background Image for USB Window
USB drives or flash drives are widely used to transfer data between computers or carrying portable softwares so you can use different software in computers that do not have these softwares installed already. I have already shared some articles on making USB drives bootable and how can you hide, lock or encrypt files and folders in a USB drive.

This is an easy step by step tutorial on how you can put an image or picture on the background of a USB device. Follow these easy steps to display an image as background in your USB drive.
Step1: Copy this code in your text editor or Notepad and save it as “desktop.ini”
[.ShellClassInfo]
IconFile=%SystemRoot%\system32\SHELL32.dll
IconIndex=127
ConfirmFileOp=0
[{BE098140-A513-11D0-A3A4-00C04FD706EC}]
Attributes=1
IconArea_Image=”your_picture.jpg”
IconArea_Text=”0xFFFFFF”
VeBRA sources - don’t delete the tag above, it’s there for XXXXX purposes -
[ExtShellFolderViews]
{BE098140-A513-11D0-A3A4-00C04FD706EC}={BE098140-A513-11D0-A3A4-00C04FD706EC}
{5984FFE0-28D4-11CF-AE66-08002B2E1262}={5984FFE0-28D4-11CF-AE66-08002B2E1262}
[{5984FFE0-28D4-11CF-AE66-08002B2E1262}]
PersistMoniker=Folder.htt
PersistMonikerPreview=%WebDir%\folder.bmp
Step 2: Put this “desktop.ini” and your_picture.jpg in your USB drive and hide them if you want (Note: If the image that you want to display as background has different name change that to your_picture.jpg )
Step3: Refresh or re insert the USB drive in computer and you will see the image as background image in your USB drive.
Friday, July 24, 2009
Reformatting Your Computer Using Windows XP
Reformatting your Windows XP computer will erase everything on your hard drive and reinstall the operating system. To avoid losing your data (documents, pictures, music, etc.), you will want to backup your information prior to reformatting. See the ITS Help Desk Personal Data Backup Support Center for more information. After you have reformatted your computer, you will need to reinstall all of your personal data, as well as any software products you may use (for example, Microsoft Office, iTunes, Symantec AntiVirus, etc.).
Reformatting your Windows XP computer has three main parts:
- Reformatting the computer from your operating system CD.
- Reinstalling the drivers that came with your computer.
- Running Windows Update to reinstall all security updates and patches.
Please contact the ITS Help Desk (384-4357) prior to reformatting your computer if you have questions about any of these processes involved.
NOTE: If you have a network connection, please unplug from the network before starting installation.
1. First, make sure that your computer is set to Boot to CD. This is a different procedure depending on your computer. When your computer first boots look for an option to enter the BIOS settings. Under the BIOS settings find the "Boot Order" and make sure the CD-ROM is set to boot first. If you have any problems with this please contact the ITS Help Desk at 319-384-HELP.
2. With the Windows XP CD in the CD-ROM drive, save your BIOS settings and exit.
3. If you've done everything correctly you should be asked to "Press Any Key to Boot from CD".

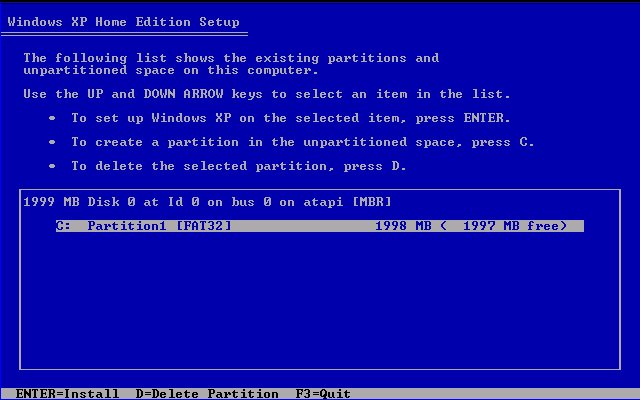
4. After installing the necessary setup files, Windows XP will display your partitions. Delete any existing partitions by selecting the desired partition with the arrow keys, press D to delete and then L to confirm the deletion.
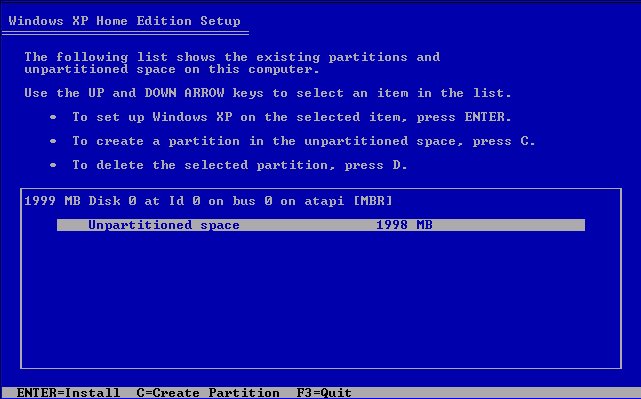
5. You should now have only one option, "Unpartitioned Space". Press Enter to install Windows XP to the unpartitioned space.
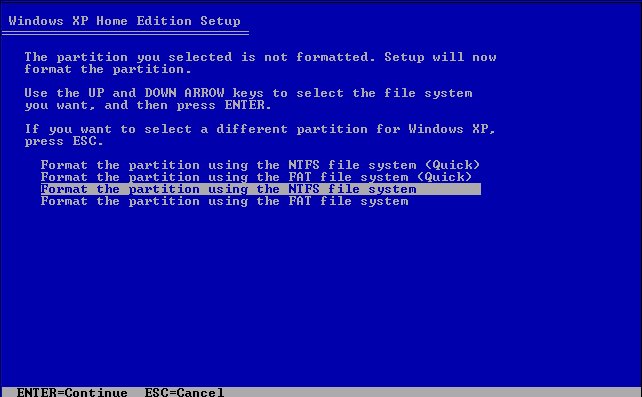
6. When asked how you would like to format the partition, select "Format using the NTFS file system".
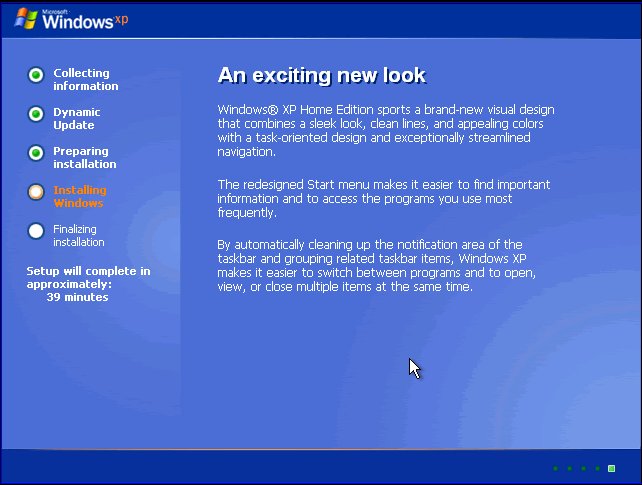
7. After the partition is formatted, Windows XP will begin installation. The computer will reboot. While the computer is rebooting, please do not touch any keys. From now on the screens will look like the following:
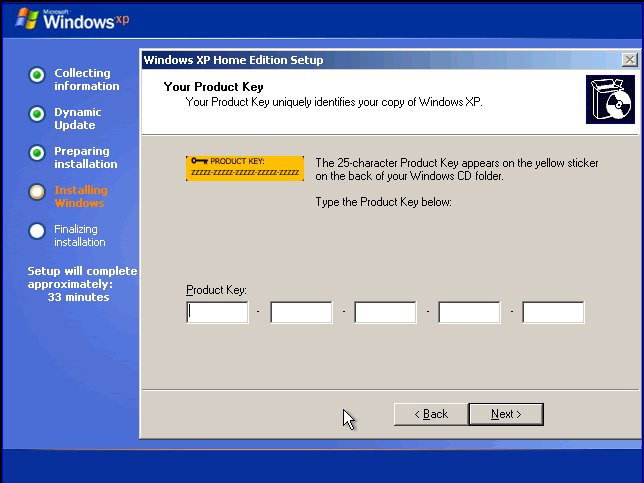
8. Enter your product key. If you purchased Windows XP from the IMU Bookstore, the product key will be located on the back of the sleeve your CD came in. If you are reformatting using a Windows XP CD that came with your computer, the product key may be located on a sticker somewhere on your computer case.
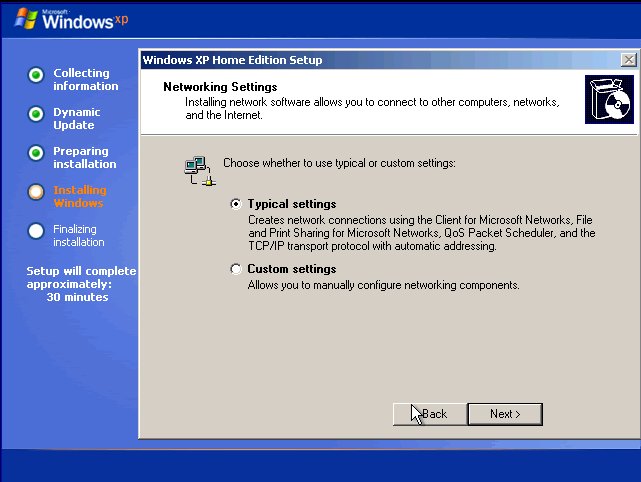
9. When asked for Network Settings, choose "Typical Settings".
10. Windows XP will now complete installation. Upon completion you will need to re-install the drivers for your hardware (Modem, Sound, Video, etc). Many PC companies such as Dell, Gateway, and HP will include a "Driver Installation CD" with the computer. Simply insert the CD and follow the instructions. Otherwise, you can download current drivers from many manufacturer's support web sites. If you have any problems please contact the ITS Help Desk at 319-384-HELP.
11. Next turn on the Internet Connection Firewall. Instructions to turn on the Internet Connection Firewall can be found here.
12. Reconnect your computer to the Network.
13. Run Windows Update by opening Internet Explorer, then clicking on Tools -> Windows Update. Follow the on-screen instructions for installing critical updates.
14. Restart your computer.
Subscribe to:
Comments (Atom)


